What’s a Work Period? Your Questions Answered

Montessori Work Period
The mind takes some time to develop interest, to be set in motion, to get warmed up into a subject, to attain a state of profitable work. If at this time there is interruption, not only is a period of profitable work lost, but the interruption produces an unpleasant sensation which is identical to fatigue.
— Dr. Maria Montessori, What You Should Know About Your Child

Consider, as an adult, what it takes for you to do your best work. What must your environment look like? What do you need from others? What constraints do you need to be removed in order to meet your goals?

Dr. Montessori spent years observing children as they played. She quickly recognized that immense learning takes place during play, leaving it reasonable to call it the child’s work. Left without interruptions, she witnessed pure magic.

Children, even very young children, have the capacity for intense concentration. They have the innate ability to work through problems and develop solutions all on their own. They want to do these things. And what’s even better? They do it with a sense of self-satisfaction, not because they feel pressure or expectation to.

What Montessori realized is that we, as adults, sometimes need to get out of kids’ way. We often imagine they require more help than they actually do, or that we must offer rewards or incentives to ensure they do their schoolwork, but those assumptions are misguided. What children really need is time, respect, and an environment in which they may focus deeply on their work.

Thus, the work period was born. Generally spanning about three hours long in the morning, this precious time is a cornerstone of Montessori education.

How does it begin?

The start of the work period varies, but typically it begins as children arrive in the morning. For some classes, on some days, and during some parts of the year, there may be a whole class morning meeting or circle time at the start or end of the work cycle.

A typical day begins with the child hanging their belongings on a designated hook, changing their shoes, and greeting their teacher as they walk into the room. They may say hello to a friend or two, take a moment to transition, and then select a work from the shelf. Others may be so eager to begin, they waste no time at all and go straight to the material they have been thinking about since the day before.

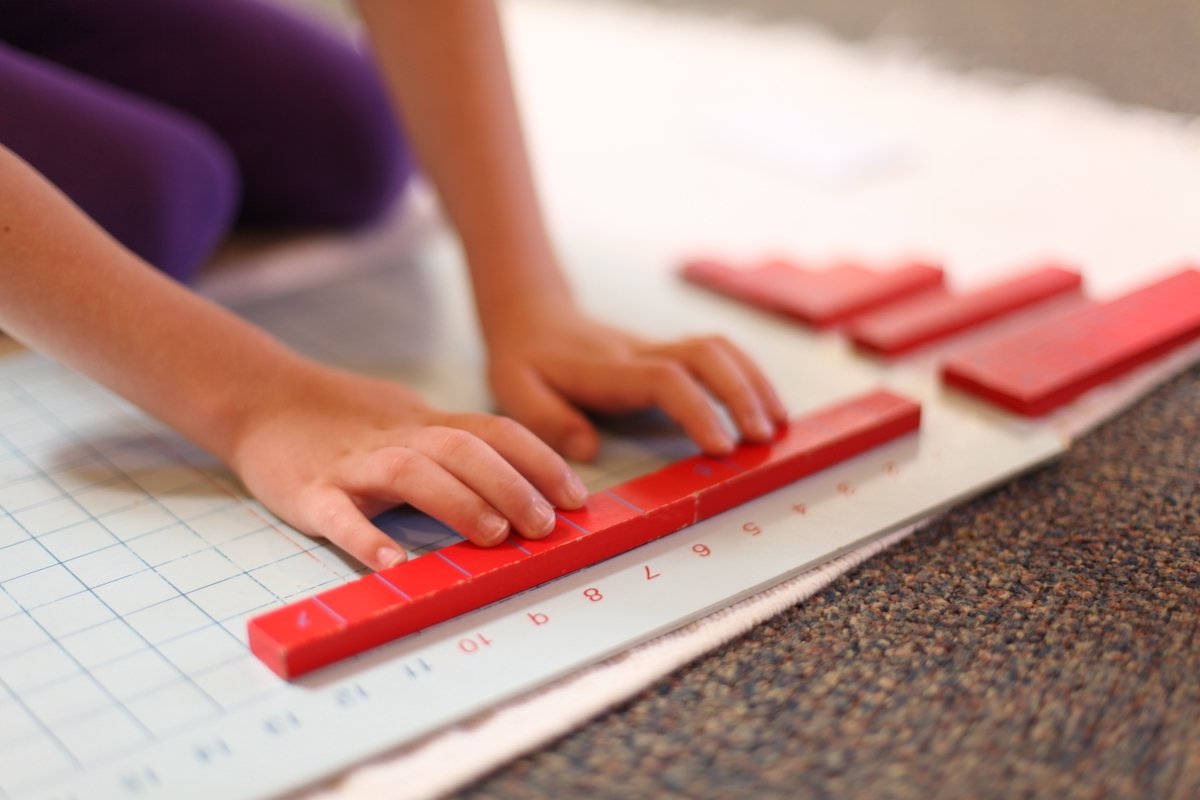
Prior to age six the child will likely work by themselves, but near their peers, most of the time. They may lay out a work rug, set up their material, and delve into a deeply concentrated state. They use the materials in the way they have been taught, then clean up and replace everything when they are done. 

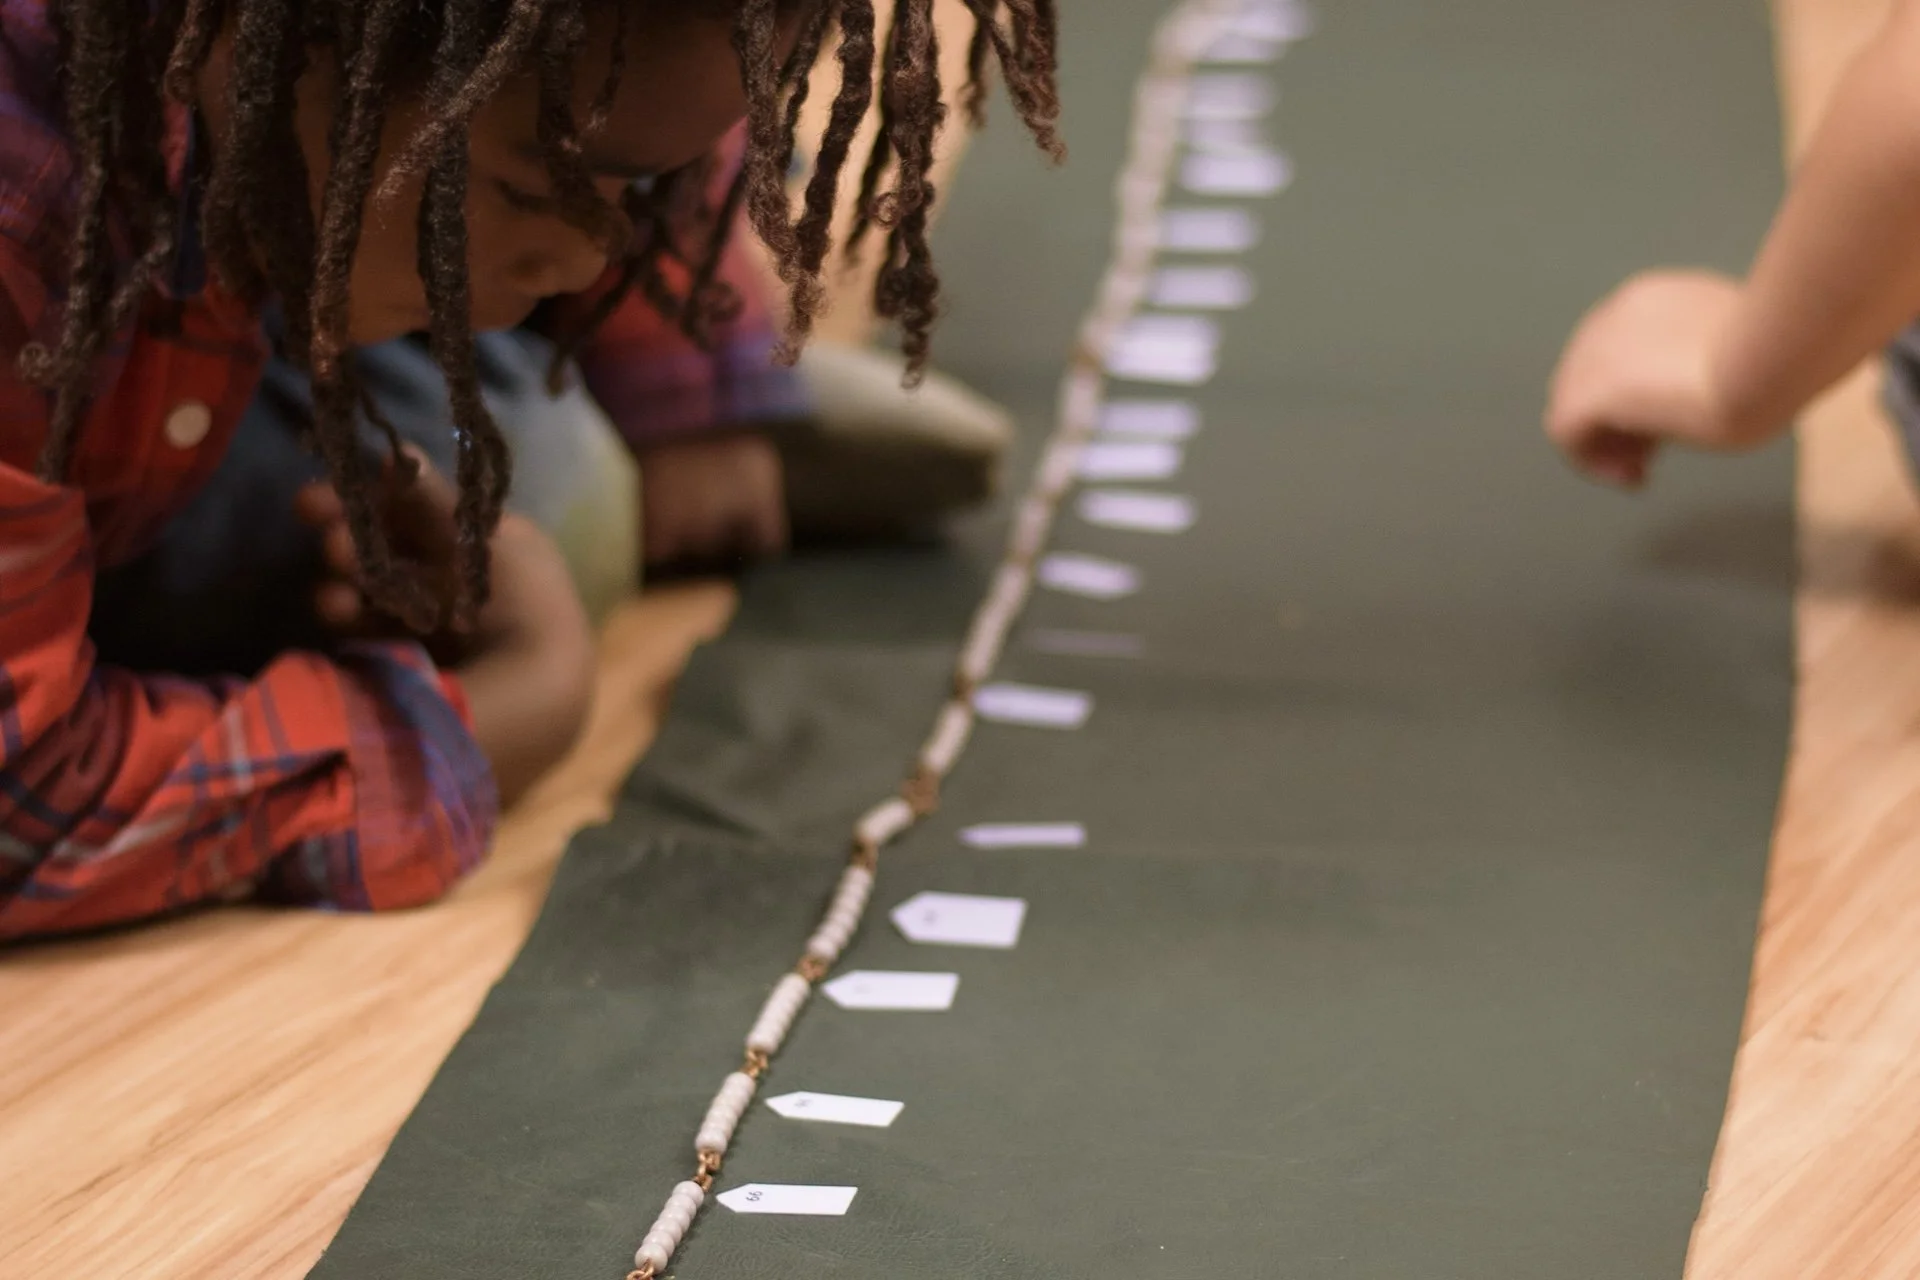
As children older than six, due to their development and desire for social connection, the start of the day can be a bit noisier and more chaotic. They still get to work rather quickly, although it’s often in the form of group or partner work.

What do the adults do?

A Montessori classroom typically has two adults present: the guide and an assistant. The assistant busies themselves with ensuring the room stays neat and orderly and that everything the children need is available to them. If children need help or redirection, the assistant is quick to engage while still allowing the child to maintain an appropriate level of independence.

This allows the guide to focus on two main tasks: observation and presenting lessons. During the work period lessons are not given to the whole group; individuals or small groups of children work with the guide to learn or review skills and materials. This is done as unobtrusively as possible. Adults in a Montessori classroom do their best not to interrupt the work of a child. If they need to speak with a student, there is often a non-verbal structure in place, such as leaving a name tag beside the child as they are working. This alerts the child to check in with the guide whenever they complete the task they are focused on.

Do children really focus the entire time?

Not usually! Can any of us truly focus for three hours straight without breaks? We definitely don’t expect our students to, either. This is one of the reasons our environments are designed for students to meet their own needs independently, when the time is right for them. If they feel hungry, they are welcome to have a snack. If they need to use the restroom, they don’t need to ask permission. Even if they just need to get up and stretch their legs or look out a window - we do not prevent children from doing these things. Allowing for breaks lets us all focus better in the long run anyway.

There is one interesting phenomenon worth mentioning here. Sometime around 10:00-10:30 in the morning, toward the end of the work cycle, classroom communities often experience what we refer to as false fatigue. Like clockwork, the volume of the children’s voices will rise, there is noticeably less engagement with the materials, and fewer children are sitting in one place - rather they seem to be wandering around the room. The adult instinct is to ring a bell or clap and make a plea for re-engagement, but we have learned to hold back. False fatigue is a normal part of the flow of the day. If we pause, observe, and wait even two or three minutes, we will see the children find their way back into their work. It can be pretty amazing to observe.

What might one work period look like for an individual child?

This article has probably already given you a fairly good idea of what this might look like. Once the child completes their first work of the day, they begin another. This repeats for the duration of the morning, but is fractured by any number of other activities. The child will likely have a lesson or two with their guide while the rest of their classmates continue working independently. At some point, the child will get hungry, have a snack, and clean up after themselves. They may take several water breaks, socialize with friends, or even spend some time watching a squirrel climb a tree outside.

In short, the work period is a way to honor the child’s way to balance focused learning with meeting one’s own needs, on one’s own timetable. It’s a way to show the child we trust them, and our students absolutely rise to the occasion.

Curious to see what a morning work period looks like in action? We would love to have you visit. Reach out today to schedule a tour.

Biographies in Contemporary Children’s Literature

Biography books for children have come a long way from the dull accounts of people’s lives that many of us read when we were young. Today’s young readers are captivated by learning about other people, whether they be major historical figures or not. The art of the memoir has changed how we tell the story of a life, and that style of writing has slipped itself beyond just autobiographies and can be found in mainstream biographies as well.

It’s impossible to list all the amazing books we would like to in this brief article, but please consider them to be a tiny slice of what’s available. As always, we provide links for you to learn more about each title, and we have sorted the books into different categories making it easier to find something suitable for readers of all ages. Enjoy!

Picture Books (primary and lower elementary children)

Picture book biographies are incredible works of art. The illustrations are gorgeous, and the writing grabs the attention and wonder of young children and the adults who read to them.  There are countless beautiful books out there; these are just a few titles that have been recently published.

In these books, children can learn about important human perspectives at a developmentally appropriate level. This includes the tragedy of the Holocaust, thriving with a disability, working hard to achieve one’s goals, preservation of native culture, dedication to social justice, and more.

Children’s Biographies (elementary and middle school children)

The first two books in this section of our list are appropriate for lower elementary-aged children, while the rest are middle grade fiction best suited to upper elementary and middle school.

Just as with the picture books above, these cover a wide variety of important and interesting topics. They explore the lives of artists and their inspirations, living with a disability, how animals can make a profound impact on our lives, the complicated experience of living between two cultures, and life as a black child in the Jim Crow South.

Graphic Novels (these particular titles are suitable for elementary children)

As we have mentioned before, graphic novels are appealing to many children, but they open doors for some. Pictures help increase our understanding of context within a story, and graphic novels present literature in easier-to-consume “bites”. Accessibility is important, and getting kids to read, in whatever way works for them, is a great thing.

These three books happen to be about famous figures, but they have a nice way of presenting biographical information to children in an interesting and memorable way.

Young Adult Biographies (high school)

High school students are typically ready to consider heavier topics. They have a deep sense of justice and the motivation to make change. This makes it the perfect time to introduce them to how life is sometimes messy, complicated, and unfair.

Themes include growing up black in America, immigration and war, surviving sexual assault, and being falsely accused and imprisoned. One of the books - Passport - is a graphic novel that details the author’s life growing up with parents who work for the CIA.

Materials Highlight: The Word Study Cabinet

Each month we highlight one of the amazing Montessori learning materials here on our blog. This week we take on a well-recognized  feature in any lower elementary environment: the word study cabinet.

Typically housed in a tower of tiny labeled drawers, groups of cards allow children to study an important area of language, and to do so independently.

The Presentations

Perhaps it is easiest to start by listing the skills covered by the word study materials:

  • Compound words

  • Prefixes

  • Suffixes

  • Homophones

  • Homonyms

  • Homographs

  • Synonyms

  • Antonyms

  • Contractions

  • Syllabication

One of the most important parts of word study happens before a child even touches a drawer of cards. A small group of children gather with a guide, usually on the floor around a work rug. The teacher often has any number of supplies that may include strips of paper and markers, a small chalkboard or dry erase board, prepared booklets, charts, and so on. What the teacher brings varies depending on the lesson - and there are many!

Many of the skills listed above require more than one lesson to be given to each child over time, as their understanding increases. Each of these lessons can look very different.

Here is one way the concept of contractions might be presented to a child:

Using the movable alphabet materials, the guide lays out the letters for a group of words, appearing as follows. (Note the red used to isolate the apostrophes.)

she is     she’s

can not     can’t

you have     you’ve

who would     who’d

will not     won’t

After reading through the words, which the children recognize from speaking, the guide defines the task of an apostrophe. The children are asked what else they notice, and they eagerly point out the missing letters.

The guide asks the children to take a deep breath, pointing out how the ribs expand and contract. They say that to contract means to become compressed, or smaller, and then they are able to tell the children that these types of words are called contractions.

Continued Work

Once the child has a basic understanding of the skill, they are asked to progress through the drawers independently. For example, after having received the above mentioned contraction lesson, the child begins with contraction drawer 1. This may not happen until the next day when the child is independently selecting materials during the work cycle.

The child takes the drawer out and lays out all the cards. They see before them a group of words much like the one the guide had laid out using the movable alphabet. The child gets to work matching, and the nature of the material ensures they match correctly, or else the final cards would not make sense.

The child records the words in their notebook, cleans up the cards, and puts everything away. The next time they’re ready for independent word study work, they move on to contractions drawer 2, and so on, until the guide recognizes the need for a new lesson or skill.

Extensions

Sometimes, a child may progress through the drawers more quickly than expected, or they may have extra enthusiasm for the subject area. To provide more excitement and challenge, the guide will have a file of black line masters intended to give children more practice with the same skills, but using pencil and paper instead of the material.

Perhaps surprisingly, these are essentially worksheets! While it is rare to find a worksheet in a Montessori classroom, their novelty is just what is needed in some situations, and they can provide a nice transition for the lower elementary child who is moving away from the heavy reliance on physical materials.

Want to see the word study materials in action? Call us today to schedule a tour. The best way to learn about Montessori is to spend time in the classroom.

Materials Highlight: Memorizing Addition Facts

Ahh, memorizing one’s addition facts. Brings back great memories, doesn’t it? For some of us this was a boring and necessary part of our education, but for others it was downright dreadful.

It’s rare to find any sort of information required to be memorized in a Montessori school. We would much rather teach our students why various things are, then have them learn rote processes that mean nothing to them.

Math facts, however, are the exception to this rule...sort of.

We absolutely work with our students to ensure they memorize all their basic facts, we just do it a bit differently. It’s not your typical flashcards-and-timed-drills approach, but a series of strategies that appeals to the child while still reaching the ultimate academic goal.

Memorizing facts is essential to solid numeric understanding and as preparation for efficiently completing more complicated problems later on. As you might imagine, we start this process when children are young, and we use specialized materials to help them feel and envision what the numbers are doing.

Addition Strip Board

Pictured above, this is the first material intended to be used while teaching children to memorize their addition facts. It includes a wooden, gridded board with numbers across the top. Numbers one through ten are written in red, followed by a red vertical line drawn down the board, and numbers eleven through eighteen written in blue. The material also includes a box filled with wooden blue and red strips in varying sizes to be used on the board.

There are many ways to use this board, and a Montessori guide will gradually walk the child through a series of lessons to teach different skills. The basic concept involves the child laying out one wooden strip on the board, then laying another beside it. This allows them to clearly see something like 7+3=10. The strip board is also used in conjunction with the tables of addition (more on those below).

Addition strip board lessons may include:

  • A first exercise introducing the child to the material and the basics of using it.

  • Random selection and adding of numbers from a box.

  • Combinations of a number (e.g. ways to make ten)

  • Combinations with zero

  • Doubling numbers

The addition may be introduced during the kindergarten year, but is used during the first year of lower elementary as well, or longer if a child needs it.

The Tables of Addition

At first used alongside the addition strip board and later used on their own, the tables of addition are another material that aids children on their path to memorization. The material actually includes four square working charts (one of them pictured above), two larger rectangular control charts, and a box of numbered tiles. To decode, the child will complete the work using one of the square charts and use the control chart to check their answers.

The first table of addition is what you might imagine having used on paper when you were a child. Numbers one through ten go across the top and also down the left side. Answers fill in the grid across the rest of the board, so that if you slide your finger down from the seven on top and right from the three on the left, you will arrive at the answer - ten - in the middle. Children can use this as a way to check their answers, too, as they use the addition strip board.

The second table (above) is essentially the same but with the center numbers left blank. Children can use this as they use the strip board, creating the problem on the strip board and then filling it in on the working chart, or they can use the working chart on its own, attempting to fill in all the blank spaces with the correct tiles.

The third table shows all possible combinations. This means there is significant blank space and children get an introduction to the commutative property. This particular visual will help the child see more patterns within the number facts than they may have in the past.

The fourth table is missing even more numbers, featuring each sum only once. The child is at this point required to complete even more independently, but as always, can rely on a control chart to check their answers if need be. These control charts are often nearby but flipped upside down by the child to self-encourage and figure out the answers on their own whenever possible.

The (Positive) Snake Game

There are actually multiple snake games used in the Montessori math curriculum, yet this is the first. It is used after children have had sufficient time to use the other addition memorization materials and have begun to memorize some of the facts. A major aim of this snake game is to revisit the concepts of making ten and exchanging for ten.

The material consists of three wooden boxes. One contains golden ten bead bars, another contains various colored bead bars for numbers one through nine, and the third contains black and white bead bars that will be used as place holders.

The child may lay out bead bars randomly, or they may follow along with cards given by the guide to complete a problem such as 4+2+8+1+7+9=. The colorful bead bars will be laid out in a zigzag formation, taking on a snake-like appearance. The child will start at one end and count beads until they get to ten, then, using the golden ten bars and black and white place holders to take the place of the colored bead bars. This continues until the snake has been all counted up, and the child can count by tens and the remainder to find the answer.

The educator in this video gives a clear demonstration of the process. You may notice him placing the used colored beads in a small glass bowl. Sometimes children will take these out afterward and count them up to check their answer.

Hopefully you have learned something new and interesting from this article. Want to see the materials in person? Reach out today! We would love to chat more.

Inviting Art Into Your Home

If we try to think back to the dim and distant past... what is it that helps us reconstruct those times, and to picture the lives of those who lived in them? It is their art... It is thanks to the hand, the companion of the mind, that civilization has arisen.
— Maria Montessori

Art is a fascinating thing. It doesn’t even matter if we create it or experience the work of others; art touches us all. It makes us think, it gives us windows into the worlds of others, it serves as a record for the general human experience. Studies show that art has a definite positive impact on children. 

While schools everywhere are forced to deal with budget cuts, art is often one of the first things to go. We can guarantee you that’s not the case at our school, and in fact art is woven into the various subjects as well as taught directly. This article isn’t a question of whether or not your child will receive art education at our school - they absolutely will.

This article is here to inspire you should you want to bring art into your own home.

Curious to learn what this might look like? There are a number of ways to approach the subject. Read on to learn how.

Go out into your community

Looking for something to do as a family on the weekend? Look no further than your own town or city. Art is everywhere! Here are just a smattering of places to consider:

  • Museums

  • Murals on buildings

  • Outdoor sculpture

  • Public buildings such as municipal buildings and libraries

  • Public parks

Going to view art in your community can be a transformative experience for children and adults. At the very least, it’s a fun way to spend an afternoon.

Ready to take it a step further? Work together as a family to create environmental art. A quick image search will give you inspiration, then it’s just about gathering available sticks, leaves, stones, or whatever else nature has left lying on the ground.

Literally bring art into your own home

Finding ways to bring the art of others into your home is easy and can be done in several ways:

  • Pick up postcards at your local art museum. Tape them to the wall of your child’s bedroom and create a rotating display of images. Old calendars can be used similarly!

  • Have art books on hand for your child to look through. Find these at your local second-hand book shop or your local library. They are often oversized with art that takes up entire pages. Their beauty and novelty is sure to evoke interest.

  • If it’s within your budget, purchase art to display in your home. Simple ways to do this include finding prints of your favorites or buying the art of local artists.

Create space for your child to become the artist

This is an opportunity for your child to create and for you to make a small replication of the type of work they might see in their Montessori classroom. Find an old tray or basket you have stored away, rummage through your child’s existing art supplies, and spend a few minutes putting together something meaningful. Then set it on a shelf, windowsill, or table where they can use it whenever the mood strikes. The possibilities are endless, but here are just a few ideas:

  • Playdough creations - include a small sealed container of dough and whatever “doodads” you have lying around. This could be sequins, googly eyes, small nails or screws, buttons...you get the idea. Young children will enjoy making truly unique sculptures (and as their parent, you will delight in what they come up with!).

  • Watercolor - Cut watercolor paper into small rectangles (the smaller pieces are less intimidating and much more manageable). Leave this out with a small cup for water, a brush, and a paint set. Option: include a pencil or permanent marker, too.

  • Collage - Great for all ages, including teens, and super simple. Include a couple of pieces of plain paper to serve as the base, a glue stick, scissors, and whatever interesting scrap paper you have lying around. This could include magazines, interesting wrapping paper, or even junk mail.


We hope this has given you an idea or two that you’re excited to try. Are you already a family that engages with art regularly? We would love to hear more ideas and experiences that have worked for you and your children!

Plant Care: Practical Life Meets Science

Montessori students begin studying biology at a young age, usually around age three during their first year in the primary environment. This work continues throughout the course of their time with us. They explore information with more depth than you might imagine, so they end up with a strong base of understanding about living organisms.

Along with zoology, botany is one of the earliest subjects explored. We give our students lessons about plant life and there are supplemental materials on the shelves for them to explore. The learning doesn’t stop there. When it comes to biology, we believe having living examples present whenever possible is one of the best ways to spark genuine interest and increase understanding. Plants are one of the easiest ways to do this, and within our classrooms and throughout the building you will find many beautiful examples of this type of life.

It’s important to note that the plants we keep are not just for display and observation. Our students - even our very youngest students - take an active role in caring for the plants.

The Practical Life Angle

When we think of practical life, all that we teach generally falls under the umbrella of three categories: care of oneself, care of others, and care of the environment. The more we participate in this type of work, the more we realize how connected the categories are.

Plants are one of the best teachers of practical life skills. We keep living specimens in our classrooms intentionally - and for many good reasons. Studies have shown the presence of plants to have a positive effect on peoples’ moods, they are helpful in filtering the air, and they contribute to the natural beauty of our classroom environments.

But - rather than just letting a bunch of pretty plants sit there and be cared for by the teachers, we engage our students in the important work of plant care. The children in our classrooms learn how to properly water living plants. They learn to dust their leaves. They learn to recognize that some plants need more sunlight than others, and that it is up to us to ensure we place them in proximity to windows accordingly.

Beyond the potted plant, our students learn to appreciate the art of arranging flowers to beautify the classroom. They plant gardens, tend to their seedlings, and harvest their own vegetables. They take on a sense of responsibility for living things that are reliant on them. The original Montessori Erdkinder model for adolescents is based in part on students running their own active farm. This still happens in some schools, but others (where an actual farm is not practical or possible) find ways to engage similar types of experiences.

We believe teaching students how to care for plants has numerous benefits. Well-cared-for plants beautify the learning environment, bringing a sort of energized calm into the atmosphere. Plants are also a wonderful introduction into learning to care for something beyond yourself; they have the ability to teach both empathy and responsibility.

The Science Angle

Starting in Montessori primary classrooms and continuing on throughout their school career, our students study botany each year. The skills start simply and are often accompanied by gorgeous wooden puzzles, but our study of plants is always rooted (don’t mind the pun) in living examples.

The content covered is wide-ranging and often intertwines with other subject areas. Here is a general idea of the scope and sequence of our botany curriculum:

  • Parts of… (a plant, a tree, a flower, a seed, etc.)

  • Identification of various leaf shapes

  • Evolution of plants on Earth

  • Types of plants

  • Plant reproduction

  • Plant respiration

  • Categories with the plant kingdom

  • Botany experiments

  • In-depth studies of types of plants and parts of plants

  • Native and invasive species

  • Plants’ roles with ecosystems

  • Interactions between people and plants

  • Plants’ roles in economies

There are opportunities throughout your child’s time at our school to engage in “research projects” about plants. Sometimes young children may choose to write or draw about what they’ve learned, while older children might take an interest in a particular species, looking up information and writing reports to be shared with classmates.

Exposure to botany beginning at such a young age, coupled with an understanding of how plant life has evolved over the course of Earth’s history, leads Montessori children to appreciate and understand more about this kingdom than many of their peers. They are encouraged to explore their own interests more as they get older, and it’s often amazing how many of them choose independent exploration of this particular subject.

Bringing It Home

Parents often ask us how they can support the Montessori curriculum in their own homes. While we do not advise families to purchase Montessori materials, as they can only be used correctly after receiving specific training, caring for plants in your home is a wonderful way to bring your child’s school experience into your home.

Start simply! This might even be just picking up a bouquet of flowers at the store, or gathering wildflowers near your home, then asking your child to show you how they learned to arrange them at school. Provide your child with a pair of scissors, a vase or two (or even just empty glass jars!), and access to a sink. If they are still learning, you might guide them in making sure they trim stems at an angle, and explain how this allows the cut flowers to absorb more water. Allow your child to display the flower arrangements inside your home.

If you’re ready for more, engage your child in the care of your existing houseplants, or perhaps purchase one or two for them to take charge of. Teach them to recognize that different types of plants have different light and watering needs. Remind them to mist or dust leaves occasionally, not only to make the plants look nice, but to help them be more efficient in their photosynthesis.

If you’re feeling really ambitious... spring will be here before you know it! January is a time when gardeners delight in huddling inside their warm homes, thumbing through seed catalogs and planning out what they will do during the upcoming seasons.

We hope this article has provided you with both helpful information and maybe a little bit of inspiration. As always, we would love to hear from you! If you have questions or want to see what this looks like in our schools, please reach out and let us know.