Materials

Materials Spotlight: The Bead Chain Cabinet

Montessori bead cabinet

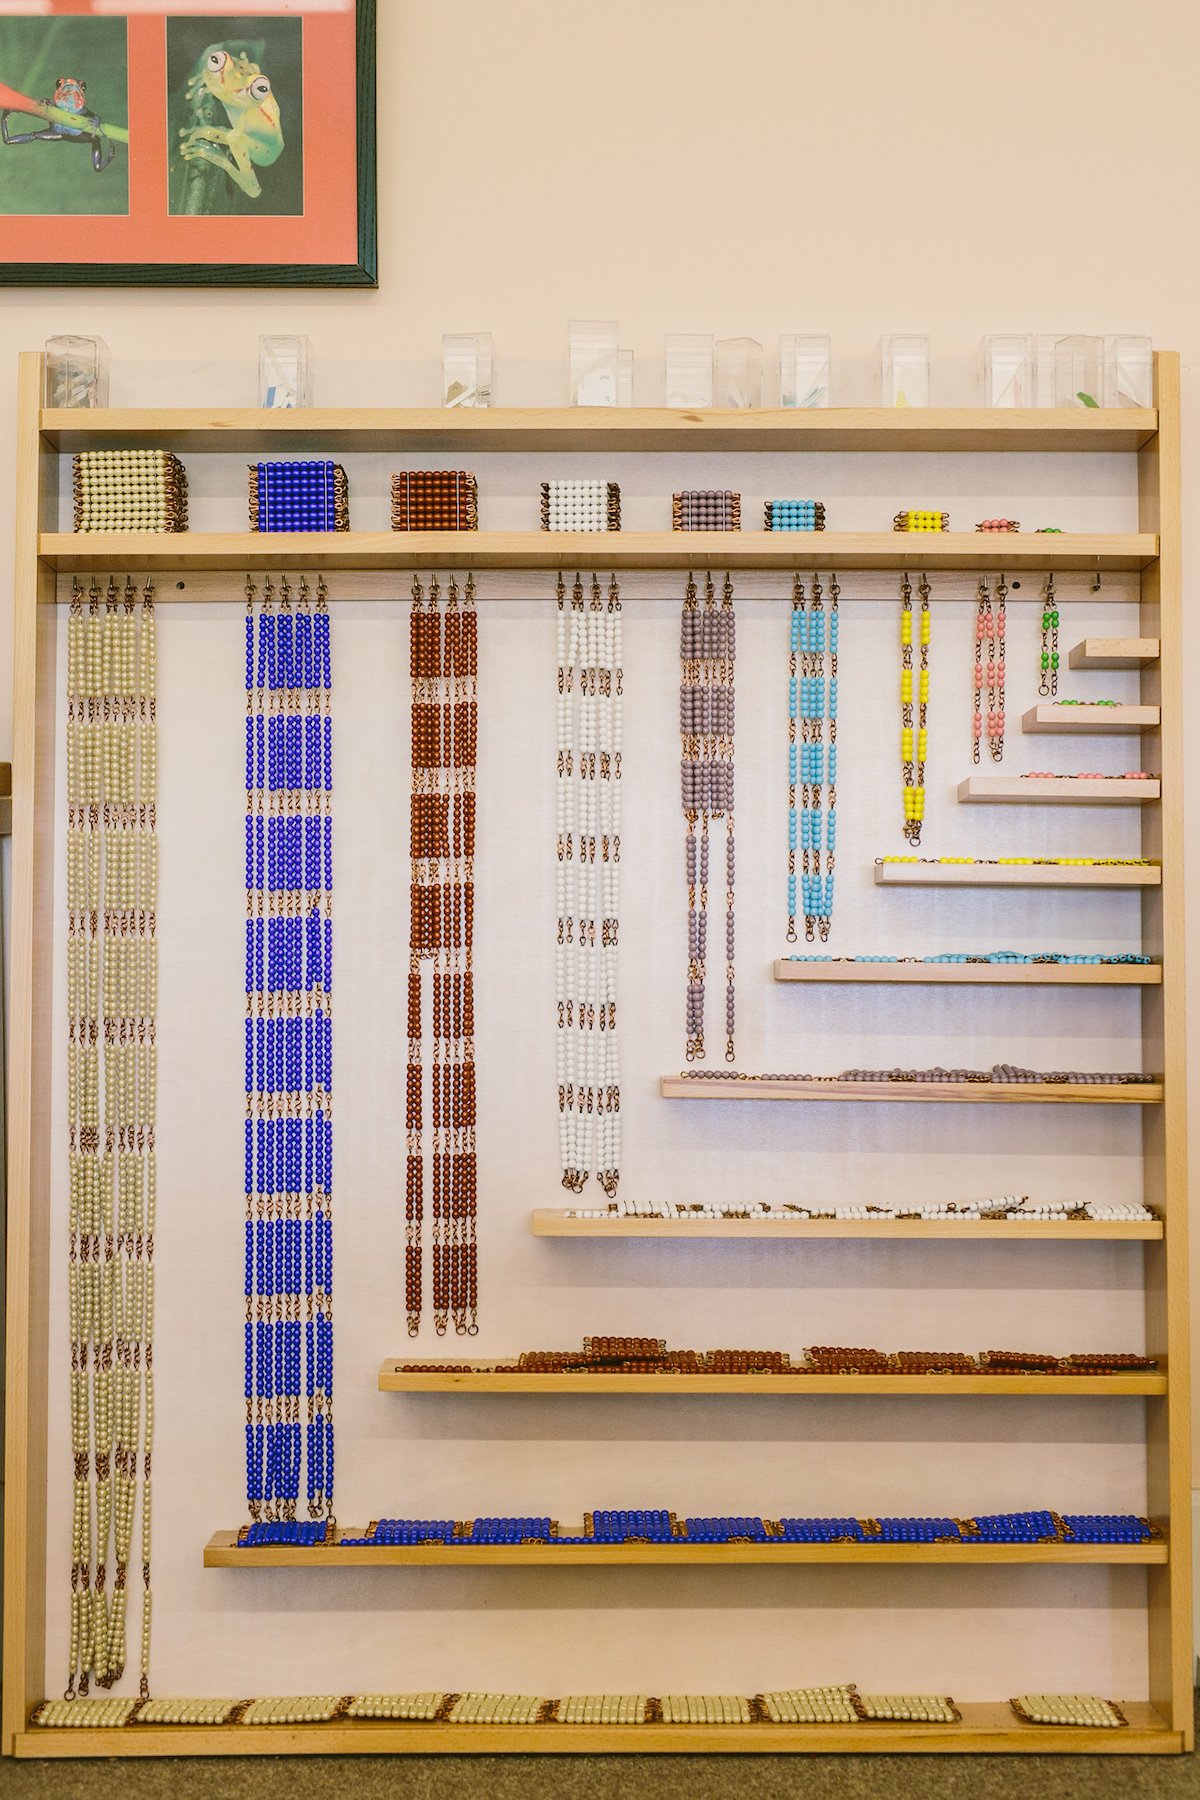
Visit any primary or elementary Montessori classroom and you’ll immediately notice a stunning display of colorful glass beads hanging in an open cabinet. Children (and adults!) are drawn to the order and elegance of the bead chains. Beyond their initial aesthetic appeal, the bead chain material offers an amazing array of intellectual opportunities for young children to those in their elementary years. 

Color-coding

One of the brilliant aspects of the Montessori math materials is how they provide children with multiple ways to make neural connections. For example, each of the bead bars represents a quantity and each bead bar is also color-coded so that the quantity is connected to a color: a bar with two green beads represents two, a bar with five light blue beads represents five, a bar with eight brown beads represents eight, etc. This color coding allows the child’s brain to establish multiple quick ways to understand the quantity: the number of beads, the color, and the size. 

Appealing

In Children’s House, young children are attracted to the beauty and fragility of these colorful, glass beads. Long before they are ready to use the bead chains, young children can learn how to dust and care for the beads. They develop a respect for the materials and understand how special they are. Often young children will watch in awe as their older classmates learn how to carry, lay out, count, and label the bead chains. 

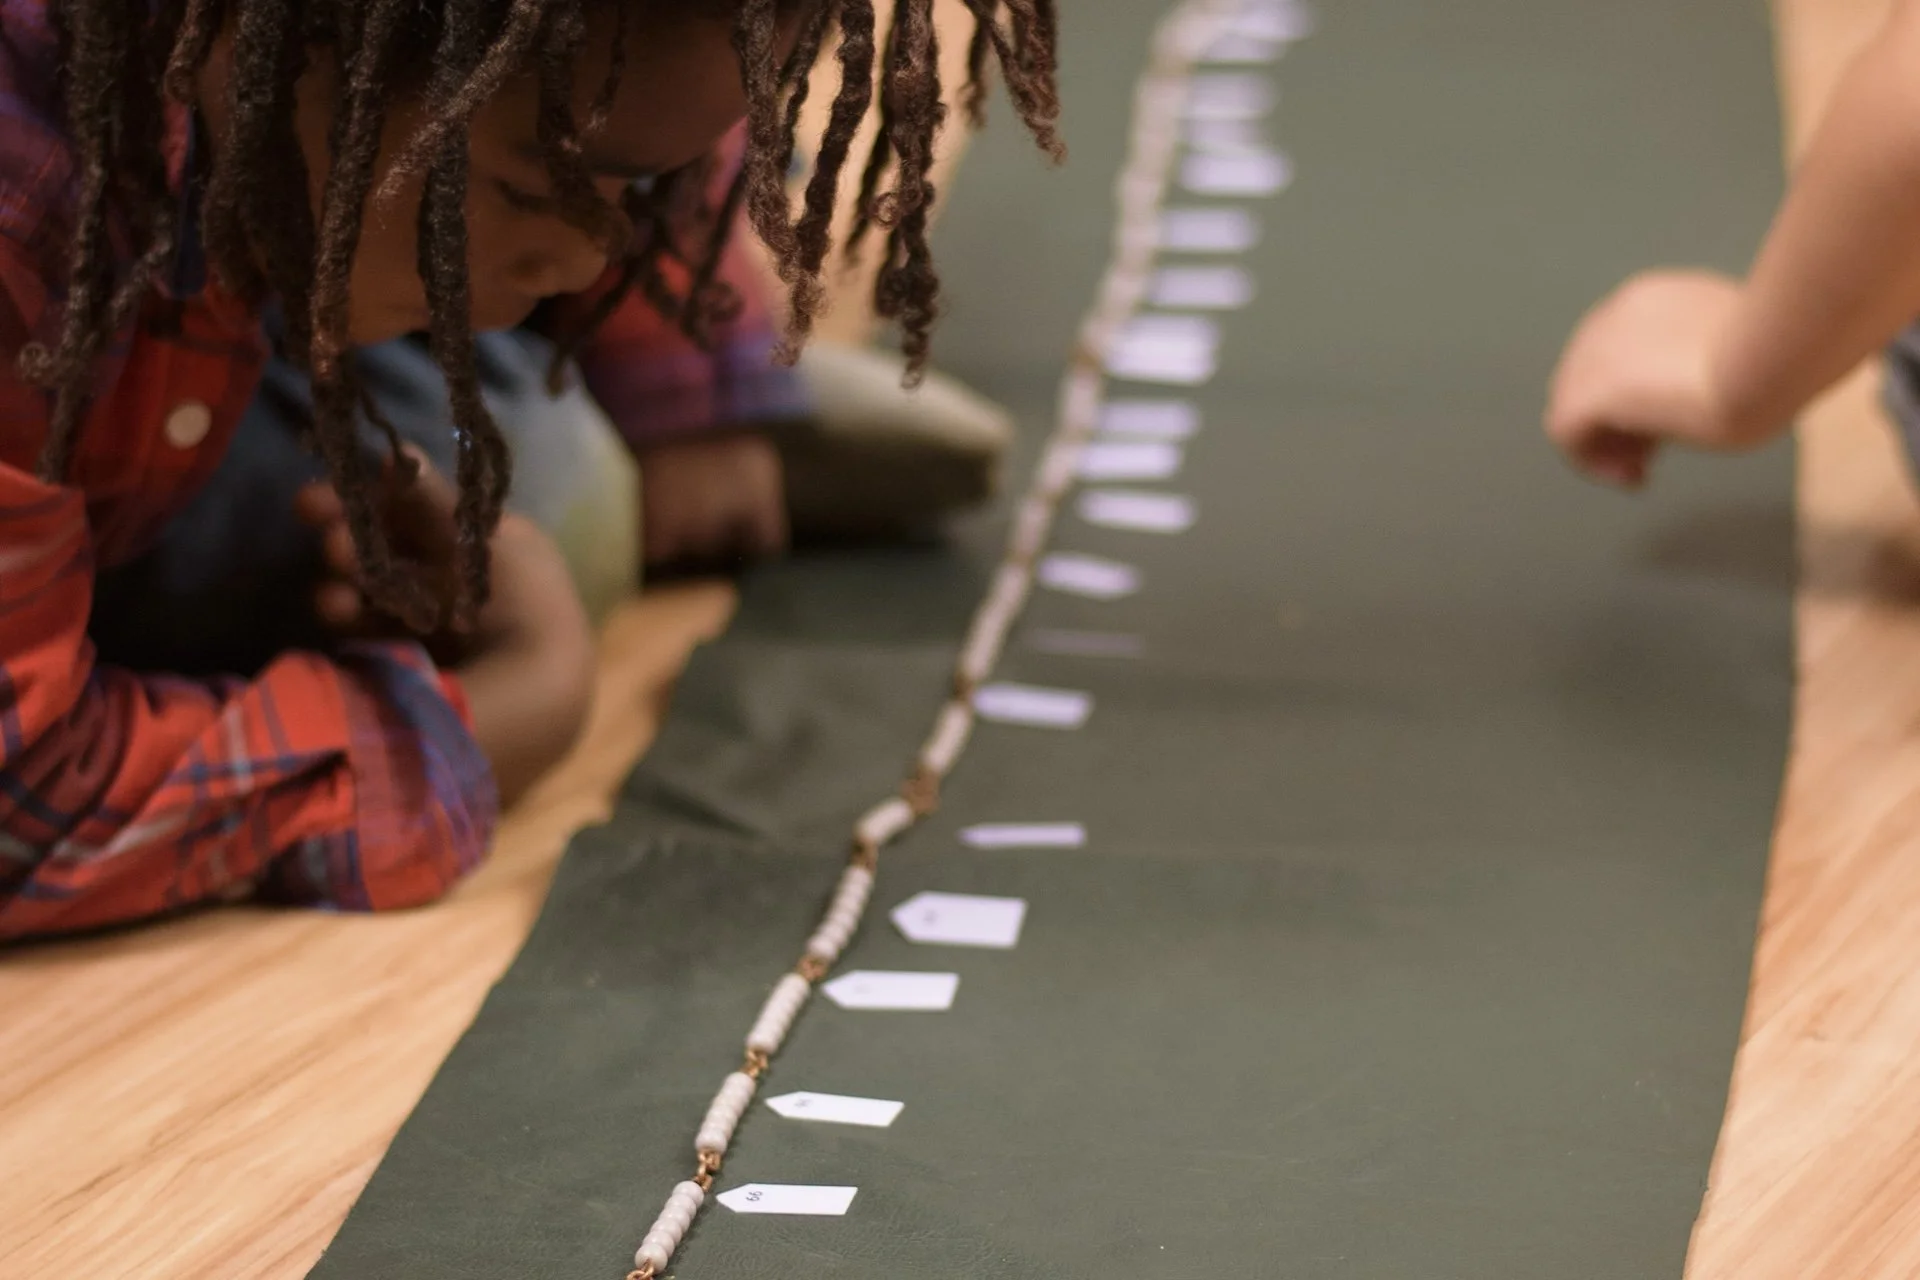
Linear & Skip Counting

As they practice counting the bead chains, four- and five-year-olds solidify their understanding of teen numbers, as well as quantities from units, to tens, to hundreds, to thousands. Eventually the focus of work with the bead chains shifts from linear counting to skip counting, as children begin to focus more on the labels that indicate the end of each bead bar. For example, on the 100 chain, children label and name 10, 20, 30, 40, 50, 60, etc. Children can also layout, count, and compare the 100 chain and 1,000 chain side-by-side, providing the sensorial experience of the different quantities laid out in a linear fashion. 

Multiplying

As children move into their elementary years, they are solidifying their skip counting in relation to mastery of multiplication. They love to quiz each other by turning over some of the labels to see if their friends can figure out which of the multiples is missing. So for the short chain of multiples of seven, for example, they might turn over one label to see if their friend can figure out the missing multiple: 7, 14, 21, __, 35, 42, 49. 

The bead chains are also used to provide an impression of common multiples, which is critical for future work with fractions. Children lay out two long chains side by side, label the chains, and then find all the common multiples, and also begin to intuit the concept of the lowest common multiple.

Squaring & Cubing

The other fascinating aspect of the bead chains is how they geometrically represent the concept of squaring and cubing. Children learn how to fold up the bead chain so that it creates a square made up of four rows of four: 4 x 4 = 16. 

This work can continue with the long chains, each of which creates the cube of numbers one through ten.

In addition to the hanging chains of bead bars, the bead chain cabinet also contains beautiful squares of each number, which can be stacked to create cubes, as well as the actual cubes for each number. The squares and cubes can be used for explorations with powers of numbers as well as more advanced work when students start to explore working outside of the base ten number system. 

As children move into more advanced mathematics, they will often briefly revisit this foundational material to cue their memory when working with exponents.

Spiral Curriculum

The bead chain materials provide a perfect example of the spiral nature of the Montessori curriculum. From early linear counting, cycling into an understanding of multiples, to preparation for squaring, cubing, and base number work, children come back again and again to the beauty and breadth of the bead chains.

We invite you to visit our school to see the bead chains for yourself! 

Materials Spotlight: Montessori Mobiles

Did you know? Montessori education can begin at birth!

In their first weeks of life, babies begin to focus their eyes and track objects. These small acts of visual control provide an important foundation for newborns who are building their neural networks. To set infants up for success, we offer a series of specially designed mobiles to aid this development.

Each Montessori mobile is created with particular characteristics to help babies further develop their sense of sight, depth perception, concentration, hand-eye coordination, and more. Plus, newborns love them!

Essential Characteristics of Montessori Mobiles

Montessori mobiles follow a progression that parallels infant development. The first mobiles have a visual focus and begin with basic shapes. They progress to include more complicated objects and eventually become interactive and tactile.

The first mobiles are simple and light enough to allow them to flow with gentle air currents. In order for infants to have the best visual experience, a mobile should be hung so that it is about 12 inches in front of them rather than directly above. When babies are lying on their back, there should be a visual line at about a 45-degree angle from their eyes to the mobile. This particular placement allows infants to see the whole mobile moving.

Each mobile has visual components designed to help infants track the objects and sharpen their vision. Then after these opportunities to follow objects visually, infants begin to have more arm and hand control and might begin to reach and grasp objects nearby. To support this new ability to reach and grasp, the mobiles take a slightly different form and thus need to be easy to grasp, colorful, and safe for children to mouth.

Progression of Mobiles: Visual

The first four mobiles–the Munari, Octahedron, the Gobbi, and the Dancers–provide babies with meaningful visual experiences when they are just recognizing shapes and then later identifying colors.

The Munari

Newborns can only see black and white, so the first mobile we offer does not have any colors and is composed of black and white shapes with contrasting borders and a hanging glass sphere. The hanging glass sphere reflects light and captures infants’ attention. Named after Bruno Munari (1907-1998), an Italian architect who created a series of mobile sculptures that created patterns of light and shadow, the Munari provides newborns the possibility to begin to focus on one object and experience the difference between light and shade.

The Octahedron Mobile

Children start seeing color around two months of age and this mobile introduces primary colors, as well as three-dimensional objects. The traditional mobile has three octahedrons–one red, one yellow, and one blue–made of glossy, reflective paper. Light reflects off the shiny paper and attracts the infants’ attention. Although other simple geometric shapes can be used, it’s best if they have straight lines. When the shapes move, their movements simulate a circle. Although typically introduced around two months of age, the mobile can be used as early as one month of age, because some babies may already be seeing colors and those who aren't may be encouraged to see the new colors.

The Gobbi

We introduce this mobile around one or two months of age, but after the Munari and Octahedron. The Gobbi is made of five spheres hanging from a horizontal rod. The spheres are covered with embroidery floss and have graduation of one color from light to dark and hang in a progression on a 45-degree angle so that the darkest sphere is lowest and the lightest sphere is highest.

The Gobbi was designed by Gianna Gobbi (1920-2002), Dr. Maria Montessori's assistant in the early 1950s. Created specifically for a Montessori environment, the Gobbi helps babies begin to see a gradation of colors and sharpen their visual abilities.

The Dancers

This mobile is made with light, metallic paper of two different colors. The paper is cut into shapes and hung in a way that resembles four dancers. The parts move with the slightest current of air and light plays off the mobile as the dancers spin around.

This mobile moves faster, has parts with two colors, and has shapes that aren’t as definite due to each part within the dancer moving separately. These new visual components help babies with depth perception and focus as they track the different movements of the shapes.

Progression of Mobiles: Tactile

The next four mobiles–Stylized Wooden Figures, Three Colored Spheres, Bell on a Ribbon, and Ring on a Ribbon– represent a shift toward objects that babies can not only track visually, but also reach for, potentially grasp, and also even pull. For that reason, these mobiles need to be attached very securely!

Stylized Wooden Figures

The first of these visual and tactile mobiles is made of light wooden shapes that are ideally realistic figures that could actually fly and move, such as birds, butterflies, or airplanes. If they are painted, the paint should be non-toxic.

In addition to being at an angle for the child to see, this mobile and the subsequent mobiles also need to be hung at a distance where the child can stretch and be able to grasp the items.  

Three Colored Spheres

Made from interlocking circles that form an impression of a sphere when they spin, this mobile is a more tactile version of the Octahedron mobile. Each of the three spheres is a primary color (painted with non-toxic paint, of course), which makes the spheres very contrasting. Because they are made from interlocking wooden disks, the hanging objects also provide babies with four sides that are relatively easy to grasp.

Bell on a Ribbon

The Bell on a Ribbon is a wonderful mobile to use when babies begin to spend more time on their stomachs, or even when they start to be able to sit. Because of this change in the children’s positioning, the mobile height may need to be adjusted.

In the beginning, babies will hit the bell by accident, then they will gradually begin to try reaching for the bell to make the sound again. When babies make contact, the bell moves and they must work harder to grasp it. The bell can also be enclosed inside a crocheted covering.

The ribbon should be attractive enough to see, but not so colorful as to distract attention away from the bell. Although attached securely, the bell should still be large enough to not be a choking hazard.

Finally, for added interest, babies can also be positioned so the bell is at their feet so when they kick it will jingle!

Ring on a Ribbon

This is the last of the mobiles in the Montessori progression and helps babies use more precise movements in order to be able to grasp the moving ring. This simple wooden ring hanging from a ribbon or elastic offers so much benefit as babies reach, grasp, release, and try again. After babies are able to grasp a thick ring, the ring can be switched out for a slightly thinner version. Older babies may also use this material to pull themselves up.

Setting the Scene

In setting up an environment for newborns, one of the key areas is a place for movement. The movement area includes a mat and a hook on the ceiling for hanging the mobiles. It’s ideal for the movement area to have a mirror next to the mat, especially because babies are developing the ability to hold and control their heads. As such, they can look at the mobile in the mirror if they need to have their heads to the side.

Montessori mobiles are meant to be used in a movement area, rather than above a changing area or sleeping area. Interacting with the mobiles is important work for babies and they need prepared space for that work. The area should have natural light and enough airflow to move the mobile, while also being warm enough to be comfortable.

To make it easier to exchange the mobiles, an elastic band or ribbon is attached to the ceiling or off the wall (perhaps with a hanging plant bracket or something comparable). To make it easy to switch out the mobiles, the end of the ribbon or elastic band has a securely attached key ring. The ribbon attached to each mobile also has a ring, so the two rings can be slid together when it’s time to hang the mobile.

Because babies are really engaged when they are focusing on and reaching for mobiles, we want to be sure to allow them to concentrate. Before making a change or interrupting in any way, we take time to observe and wait for when focus shifts and babies show signs of being finished. We start by offering the mobile for short periods of time and then take a break if babies seem to be overstimulated. The best time to use the movement area and the mobiles is when babies are fed and well-rested.

Montessori mobiles offer so many benefits for our babies. During their time with mobiles, infants practice visual tracking, develop their fine and gross motor skills, strengthen their intentional and coordinated movements, and learn how to execute a planned action. Although seemingly simple, these materials for infants are incredibly profound!

Materials Highlight: Geometry From the Start

When many of us think of our geometry education, we have thoughts of identifying shapes in kindergarten, and then taking a class or two in high school.

The truth is, children are fully capable, and enthusiastically prepared, to learn so much more at a much younger age. While we can’t possibly cover our entire curriculum in one short article, we’ll share some of the highlights. It begins (perhaps unsurprisingly) in our primary classrooms.

Geometric Solids

Pictured above, the geometric solids are our students’ first direct exposure to geometry. The solids are displayed on a shelf and are contained by a basket or tray. The adult invites the child to a lesson and asks them to retrieve the shapes. They then look at each one. The lesson may go something like this:

  1. The guide picks up the cube, feels each side, and hands it to the child. The guide states, “This is a cube.” The cube is placed on the work rug.

  2. The process is repeated for each solid in the basket.

  3. Depending upon the child’s readiness, they may continue, with the guide asking questions like, “Where is the cylinder?”

  4. After the child has had some time to interact with the material independently for a while, the guide will again sit with them and assess their understanding. This is done by holding one sold at a time and asking the child to name it.          

There are many fun extensions associated with this material. One favorite includes putting the solids on a mystery bag or using a blindfold so the child has to guess and identify by touch alone.

Geometry Cabinet

The geometry cabinet is used in primary and lower elementary classrooms, although differently in each. What begins as a lesson in identifying basic shapes and discerning between their sizes evolves into complex identification and blending of skills. Some of the skills this material helps us teach our students aged 6-9 include:

  • Types of triangles (acute scalene, acute isosceles, right scalene, right isosceles, obtuse scalene, and obtuse isosceles)

  • Quadrilaterals (trapezoids, a rhombus, and a parallelogram)

  • Regular polygons (pentagon, hexagon, heptagon, octagon, nonagon, and decagon)

  • Curved figures (curvilinear triangle, oval, ellipse, quatrefoil)

  • Rectangles

  • Circles

Constructive Triangles

Beginning during the primary years and continuing through lower elementary, the constructive triangle boxes are another child favorite. A series of boxes teaches a variety of concepts.

  1. Triangle box: Used to show how different types of triangles can be combined to make other triangles, also indirectly teaches fractions concepts

  2. Large hexagon box: Used to show how triangles can be combined to create other figures, including a hexagon, rhombus, and parallelogram

  3. Small hexagon box: A continuation of the same basic concept as the previous box, but this time triangles are used to create rhombi, a trapezoid, and another configuration of a hexagon

  4. Rectangle box: Triangles are used to create a square, rectangle, and other quadrilaterals

  5. Blue triangles boxes: While the previous boxes utilized different colors for different types of triangles, they are all painted blue here. This is basically an extension of previous work and allows children an opportunity to rely less on previously helpful visual clues. There is also lots of opportunity to use the blue triangles to create more complex geometric figures.

Classified Nomenclature

Once some of the more basic skills have been mastered by the child, sometime during early lower elementary, they move on to engage with the classified nomenclature. As with all other Montessori work, this is a step toward abstraction; they are no longer relying heavily on the wooden materials they can hold and manipulate, rather they are using drawings, booklets, charts, and labels.

This work can become rather in-depth and continues into upper elementary. A very broad overview of skills includes:

  • Fundamental concepts (point, line, surface, solid)

  • The study of lines

  • The study of angles

  • Plane figures

  • Study of the triangle

  • Study of quadrilaterals

  • Study of regular polygons

  • Study of the circle

These studies are not short lessons like the child has experienced previously. They are multi-layered and can take months to complete. For example, the study of angles may begin during the second year of lower elementary, but continue periodically through the years until the child reaches sixth grade. Concepts include:

  • Parts of an angle

  • Types of angles

  • The measurement of angles

  • Constructing angles

  • Relationships between two angles

  • Two lines and a transversal

  • Constructing and copying an angle

  • Bisecting an angle

  • Operations with angles

Beyond all these amazing materials, it’s important to note that there is a lot of crossover when it comes to Montessori subjects. One perfect example is a favorite grammar work of third graders called the Detective Triangle Game. While its main intention is to practice using correct adjectives, this is done by way of sorting a multitude of triangles, with different colors, types, and angles.

Want to learn more? Please reach out if you have any specific questions and want to have a conversation. As always, we believe the best way to truly understand what goes on in a Montessori classroom is to sit quietly and observe in one. Contact us today to schedule a visit.

Materials Highlight: The Word Study Cabinet

Each month we highlight one of the amazing Montessori learning materials here on our blog. This week we take on a well-recognized  feature in any lower elementary environment: the word study cabinet.

Typically housed in a tower of tiny labeled drawers, groups of cards allow children to study an important area of language, and to do so independently.

The Presentations

Perhaps it is easiest to start by listing the skills covered by the word study materials:

  • Compound words

  • Prefixes

  • Suffixes

  • Homophones

  • Homonyms

  • Homographs

  • Synonyms

  • Antonyms

  • Contractions

  • Syllabication

One of the most important parts of word study happens before a child even touches a drawer of cards. A small group of children gather with a guide, usually on the floor around a work rug. The teacher often has any number of supplies that may include strips of paper and markers, a small chalkboard or dry erase board, prepared booklets, charts, and so on. What the teacher brings varies depending on the lesson - and there are many!

Many of the skills listed above require more than one lesson to be given to each child over time, as their understanding increases. Each of these lessons can look very different.

Here is one way the concept of contractions might be presented to a child:

Using the movable alphabet materials, the guide lays out the letters for a group of words, appearing as follows. (Note the red used to isolate the apostrophes.)

she is     she’s

can not     can’t

you have     you’ve

who would     who’d

will not     won’t

After reading through the words, which the children recognize from speaking, the guide defines the task of an apostrophe. The children are asked what else they notice, and they eagerly point out the missing letters.

The guide asks the children to take a deep breath, pointing out how the ribs expand and contract. They say that to contract means to become compressed, or smaller, and then they are able to tell the children that these types of words are called contractions.

Continued Work

Once the child has a basic understanding of the skill, they are asked to progress through the drawers independently. For example, after having received the above mentioned contraction lesson, the child begins with contraction drawer 1. This may not happen until the next day when the child is independently selecting materials during the work cycle.

The child takes the drawer out and lays out all the cards. They see before them a group of words much like the one the guide had laid out using the movable alphabet. The child gets to work matching, and the nature of the material ensures they match correctly, or else the final cards would not make sense.

The child records the words in their notebook, cleans up the cards, and puts everything away. The next time they’re ready for independent word study work, they move on to contractions drawer 2, and so on, until the guide recognizes the need for a new lesson or skill.

Extensions

Sometimes, a child may progress through the drawers more quickly than expected, or they may have extra enthusiasm for the subject area. To provide more excitement and challenge, the guide will have a file of black line masters intended to give children more practice with the same skills, but using pencil and paper instead of the material.

Perhaps surprisingly, these are essentially worksheets! While it is rare to find a worksheet in a Montessori classroom, their novelty is just what is needed in some situations, and they can provide a nice transition for the lower elementary child who is moving away from the heavy reliance on physical materials.

Want to see the word study materials in action? Call us today to schedule a tour. The best way to learn about Montessori is to spend time in the classroom.

Materials Highlight: Memorizing Addition Facts

Ahh, memorizing one’s addition facts. Brings back great memories, doesn’t it? For some of us this was a boring and necessary part of our education, but for others it was downright dreadful.

It’s rare to find any sort of information required to be memorized in a Montessori school. We would much rather teach our students why various things are, then have them learn rote processes that mean nothing to them.

Math facts, however, are the exception to this rule...sort of.

We absolutely work with our students to ensure they memorize all their basic facts, we just do it a bit differently. It’s not your typical flashcards-and-timed-drills approach, but a series of strategies that appeals to the child while still reaching the ultimate academic goal.

Memorizing facts is essential to solid numeric understanding and as preparation for efficiently completing more complicated problems later on. As you might imagine, we start this process when children are young, and we use specialized materials to help them feel and envision what the numbers are doing.

Addition Strip Board

Pictured above, this is the first material intended to be used while teaching children to memorize their addition facts. It includes a wooden, gridded board with numbers across the top. Numbers one through ten are written in red, followed by a red vertical line drawn down the board, and numbers eleven through eighteen written in blue. The material also includes a box filled with wooden blue and red strips in varying sizes to be used on the board.

There are many ways to use this board, and a Montessori guide will gradually walk the child through a series of lessons to teach different skills. The basic concept involves the child laying out one wooden strip on the board, then laying another beside it. This allows them to clearly see something like 7+3=10. The strip board is also used in conjunction with the tables of addition (more on those below).

Addition strip board lessons may include:

  • A first exercise introducing the child to the material and the basics of using it.

  • Random selection and adding of numbers from a box.

  • Combinations of a number (e.g. ways to make ten)

  • Combinations with zero

  • Doubling numbers

The addition may be introduced during the kindergarten year, but is used during the first year of lower elementary as well, or longer if a child needs it.

The Tables of Addition

At first used alongside the addition strip board and later used on their own, the tables of addition are another material that aids children on their path to memorization. The material actually includes four square working charts (one of them pictured above), two larger rectangular control charts, and a box of numbered tiles. To decode, the child will complete the work using one of the square charts and use the control chart to check their answers.

The first table of addition is what you might imagine having used on paper when you were a child. Numbers one through ten go across the top and also down the left side. Answers fill in the grid across the rest of the board, so that if you slide your finger down from the seven on top and right from the three on the left, you will arrive at the answer - ten - in the middle. Children can use this as a way to check their answers, too, as they use the addition strip board.

The second table (above) is essentially the same but with the center numbers left blank. Children can use this as they use the strip board, creating the problem on the strip board and then filling it in on the working chart, or they can use the working chart on its own, attempting to fill in all the blank spaces with the correct tiles.

The third table shows all possible combinations. This means there is significant blank space and children get an introduction to the commutative property. This particular visual will help the child see more patterns within the number facts than they may have in the past.

The fourth table is missing even more numbers, featuring each sum only once. The child is at this point required to complete even more independently, but as always, can rely on a control chart to check their answers if need be. These control charts are often nearby but flipped upside down by the child to self-encourage and figure out the answers on their own whenever possible.

The (Positive) Snake Game

There are actually multiple snake games used in the Montessori math curriculum, yet this is the first. It is used after children have had sufficient time to use the other addition memorization materials and have begun to memorize some of the facts. A major aim of this snake game is to revisit the concepts of making ten and exchanging for ten.

The material consists of three wooden boxes. One contains golden ten bead bars, another contains various colored bead bars for numbers one through nine, and the third contains black and white bead bars that will be used as place holders.

The child may lay out bead bars randomly, or they may follow along with cards given by the guide to complete a problem such as 4+2+8+1+7+9=. The colorful bead bars will be laid out in a zigzag formation, taking on a snake-like appearance. The child will start at one end and count beads until they get to ten, then, using the golden ten bars and black and white place holders to take the place of the colored bead bars. This continues until the snake has been all counted up, and the child can count by tens and the remainder to find the answer.

The educator in this video gives a clear demonstration of the process. You may notice him placing the used colored beads in a small glass bowl. Sometimes children will take these out afterward and count them up to check their answer.

Hopefully you have learned something new and interesting from this article. Want to see the materials in person? Reach out today! We would love to chat more.

Materials Highlight: The Fraction Insets

Montessori Fraction Insets

For this month’s Materials Highlight we bring you the fraction insets; a beautiful set of metal templates resting on slanted wooden trays. As you can see in the photo above, the insets range from one whole through tenths, and each piece has a small knob allowing children to move them easily.

But before we get to the insets, perhaps we should back up just a bit.

Prior to an introduction to fractions, the child has had extensive instruction and experiences with numeration being based on the unit. One unit (or one, one whole, etc.) has been the basis by which they have learned to count, skip count, add, and subtract. As the child enters lower elementary, they are ready to learn who we may divide a unit.

This work often starts with an apple. The Montessori guide sits the children in a small group and tells them the apple will be divided for them to share. They then proceed to cut the apple without any regard to straight or even lines, creating small chunks and larger ones. The children quickly realize the injustice in distributing such apple slices, so the guide takes out a second apple to cut it evenly and impart the importance of equal slices being fair. The stage is set for learning about fractions.

An Introduction

It’s important to note that while the most commonly used and popular fraction insets are circular, there are also triangular and square fraction insets. It’s important for guides to refer to this at times so the children have an understanding that anything may be divided, not just circles.

The first time children use the insets they are encouraged to observe what they notice, and they develop the concept that each inset is a family of sorts. “These are the thirds, these are the sixths, etc.”

The guide will make a point to use intentional language to create a firm basis in understanding: “This circle is divided into four equal parts. We call them fourths.” The guide will write out “fourths” as well as “/4” as children are able to verbally express their understanding.

The Numerator

During the course of this lesson, the guide doesn’t actually use the term numerator just yet. What is emphasized is that while the children previously learned the family names of each inset, the focus will now shift to individual pieces. Examples will be shown using the material, and both verbal and written expressions will accompany each.

For example: “This is one third, or ⅓.” “This is four fifths, or ⅘.” This may be the end of the lesson, or, if the children seem to grasp the concept quickly and easily, it may be combined with the third presentation.

The Third Presentation

The third presentation is essentially a culminating review of what has been covered so far. The children may take turns matching labels with fractions to show their understanding. The critical piece is that the guide will now formally name the numerator and denominator

There is a lot of opportunity for practice and extension work at this point. Children may trace and label fractions, make booklets or charts, work together to match labels, and so on. This work typically happens during the first year of lower elementary.

Equivalence

This is an exciting lesson for children. Once they have a firm grasp on naming fractions, the guide will again sit them down in a small group. The one whole circle will be removed from its frame and the two halves will be put in its place. The guide will show the children how one whole is equal to two halves. This will be repeated with similar equivalencies: 3/3=1, 4/4=1, etc.

Next, smaller equivalencies will be discovered. The guide will try and fit a piece into a number of different spots, proving where it does and does not fit. Children will learn several simple equivalencies, such as 2/6=1/3 .

As with the previous skill, there is plenty of opportunity for exploration and extension in regard to equivalencies. This is arguably the most important fractions skill of lower elementary.

Operations with Fraction

Once a child has a firm grasp of fraction basics, they are ready to learn operations. This will likely begin in lower elementary and extend into upper elementary, and are taught initially using the fraction insets material. Another material often used is called the fraction box, which includes small plastic replicas of the red circular fraction pieces. Skills include:

  • Addition and subtraction using the same denominator

  • Multiplying fractions by whole numbers

  • Dividing fractions by whole numbers

  • Addition with different denominators

  • Addition with more than two addends

  • Subtracting with different denominators

  • Multiplying whole numbers by fractions

  • Multiplying fractions by other fractions

  • Dividing whole numbers by fractions

  • Dividing fractions by fractions

Moving to Abstraction

Use of materials when teaching fractions is critical; we believe Montessori students excel later in life with more complicated math concepts because they have such a strong foundation in the basics. Rather than memorizing rote procedures they are physically manipulating numbers with their hands, giving them a deeper understanding of why we do what we do.

One cannot rely on materials forever, though, and there comes a time when the child is prepared to move onto abstraction.

This is often achieved by the teacher again showing an operation with the material while also writing out the pencil and paper process simultaneously. In fact, children will often come to this learning independently. They are able to make the connections as they master skills. If not, the guide is there to show them the way. There comes a point during the upper elementary years when a child no longer needs to rely on the materials to determine the answer to a problem. In fact, using the materials becomes cumbersome, and they are eager to put them behind.

Want to learn more? We encourage you to reach out and schedule a virtual tour.