infant

Montessori at Home: The Baby’s Room

Montessori Baby's Room

When children come into our lives, we want to make sure we offer them the very best. Yet our children develop so quickly and their needs change so dramatically!  

By having a clear, yet simple, plan we can prepare a bedroom space for our young children that not only supports optimal development but also helps us, as adults, feel prepared for each stage of development.

Clear Spaces

The child’s room should have boundaries that will help them be comfortable and thrive. One way to do this is to create a space that only has what is needed, with specific areas for each type of activity. For example, the child’s room needs to have areas for:

  1. Physical care

  2. Sleeping

  3. Feeding (until weaned)

  4. Moving

Although these spaces will shift a bit as our children develop and their needs change, we can prepare a room that is consistent yet easily adapted for each stage of development.

Above all, the child’s environment needs to be practical, beautiful, ordered, and safe, and at this stage, also needs to meet the parent’s or caregiver’s needs.

From Zero to Five Months: Birth to Weaning

Because young infants are adapting to a new world outside the womb, they need consistent points of reference to feel secure. This sense of security and consistency–with furniture, people, and daily routines–allows our newborns to feel able to explore their surroundings.

Physical Care

During these first months of the child’s life, the physical care area in the room has furniture and items for diapering and dressing. At this time the adult is the whole world for the child, so it is best for the changing table to be set up so the adult is at the baby’s feet so they can see the adult talking (describing what is happening, naming body parts, etc.). 

Sleeping 

Ideally the sleeping area has a low floor bed that provides an unobstructed view of the room and freedom of movement. Because this bed can stay consistent as our babies grow, it can help to start with a large-enough mattress (e.g. twin bed size). With room to move, babies will start to slither and eventually will be able to freely crawl into bed.

Feeding

The feeding area begins as a space designed for nursing mothers and babies to bond during breastfeeding. The space thus needs to be peaceful with a comfortable chair and a table or shelf with everything the feeding adult needs to have close at hand.
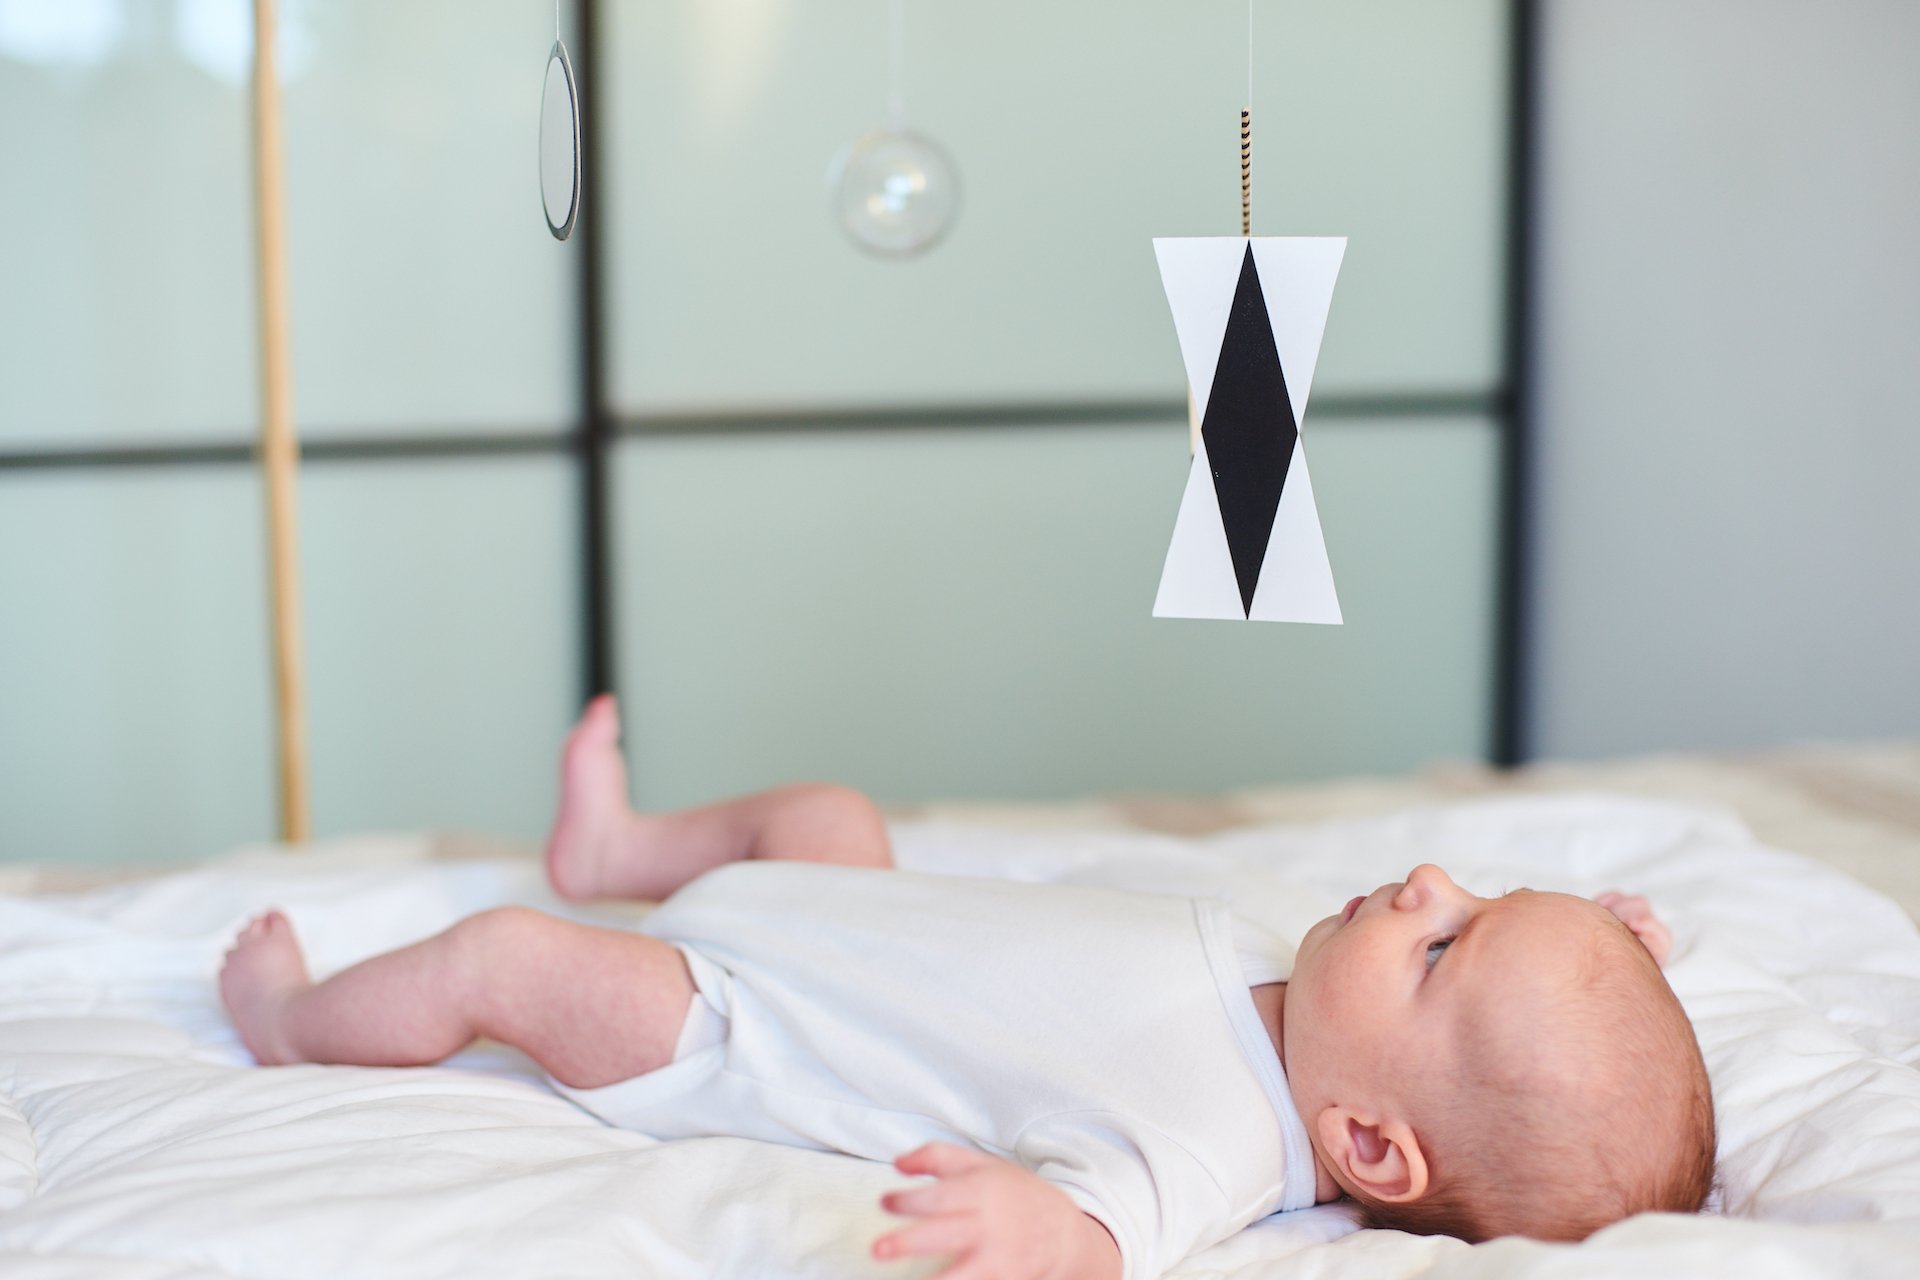
Movement

This area has three key elements: a mat, a mirror, and a low, open shelf. A hook in the ceiling above the mat can be positioned for hanging and rotating Montessori mobiles. A mirror mounted on the wall allows babies to begin to see themselves and their movements. A low, open shelf can store manipulative materials. Eventually babies will start slithering to the shelf to get these developmental aids.

From Five to Twelve Months: From Weaning to Walking

The room doesn’t need to change dramatically during this time and only needs a few, key modifications.

Feeding

The feeding area still has the adult chair for breastfeeding and snuggling, although during this time children begin the weaning process. This important separation process allows children to form their personal identity.

The weaning table and chair are important new additions to the room. This small, wooden table is very heavy and stable, with rounded edges and a beautiful place setting. In addition to a small, stable, supportive wooden chair for children just learning how to sit upright, the parent or caregiver has a stool so they can also sit and offer some of the first foods.

Movement

To help children be able to pull up and cruise, we can add a bar to the mirror and eventually remove the mat. An ottoman in the movement area can be a used for crawling around, pulling up on, and cruising around. The ottoman could be the same footstool used with the nursing chair. As children begin to cruise and walk, it’s nice to also include a lighter weight table, chair, and stool that they can push and move around themselves.

From Twelve to Thirty-Six Months: The Walking Child

Walking is an incredible accomplishment in human development. Rather than using their hands to aid in transportation, children can use them to transform their surroundings.

Sleeping Area

The bed can stay the same (or a little higher since they can now use their hands and whole body to climb onto it).

Feeding Area

At this point, the feeding area can shift completely to the family eating area. 

Physical Care Area

As children learn to walk and develop more muscle control, they will eventually shift from needing diapers to using the bathroom for toileting, or at least transitioning to standing diaper changes in the bathroom. We can thus remove the changing table and replace it with a small wardrobe with a mirror, so our children can see themselves dressing. 

Movement Area

Once children don’t need the assistance of the bar, we can remove it, as well as the mat and the mirror. It’s important to remember that children’s furniture should be proportionate to their mental and physical strength, so they are challenged, but in a way that allows for successful mastery with some effort. Above all, the furniture should be child-sized.

General Considerations

It is important to keep in mind that children have their own developmental paths. With this in mind, the above changes in the room should be done only after thorough observation of how our children are developing.

Children’s awareness of their environment begins at home, later expands to school, then to the community and local culture, and then beyond to their country and the world. The experiences children have in these environments become part of who they are, so we want to take care to prepare the best spaces possible!

If you want some inspiration, come visit our classrooms to see how we prepare environments for children’s optimal development.

Materials Spotlight: Montessori Mobiles

Did you know? Montessori education can begin at birth!

In their first weeks of life, babies begin to focus their eyes and track objects. These small acts of visual control provide an important foundation for newborns who are building their neural networks. To set infants up for success, we offer a series of specially designed mobiles to aid this development.

Each Montessori mobile is created with particular characteristics to help babies further develop their sense of sight, depth perception, concentration, hand-eye coordination, and more. Plus, newborns love them!

Essential Characteristics of Montessori Mobiles

Montessori mobiles follow a progression that parallels infant development. The first mobiles have a visual focus and begin with basic shapes. They progress to include more complicated objects and eventually become interactive and tactile.

The first mobiles are simple and light enough to allow them to flow with gentle air currents. In order for infants to have the best visual experience, a mobile should be hung so that it is about 12 inches in front of them rather than directly above. When babies are lying on their back, there should be a visual line at about a 45-degree angle from their eyes to the mobile. This particular placement allows infants to see the whole mobile moving.

Each mobile has visual components designed to help infants track the objects and sharpen their vision. Then after these opportunities to follow objects visually, infants begin to have more arm and hand control and might begin to reach and grasp objects nearby. To support this new ability to reach and grasp, the mobiles take a slightly different form and thus need to be easy to grasp, colorful, and safe for children to mouth.

Progression of Mobiles: Visual

The first four mobiles–the Munari, Octahedron, the Gobbi, and the Dancers–provide babies with meaningful visual experiences when they are just recognizing shapes and then later identifying colors.

The Munari

Newborns can only see black and white, so the first mobile we offer does not have any colors and is composed of black and white shapes with contrasting borders and a hanging glass sphere. The hanging glass sphere reflects light and captures infants’ attention. Named after Bruno Munari (1907-1998), an Italian architect who created a series of mobile sculptures that created patterns of light and shadow, the Munari provides newborns the possibility to begin to focus on one object and experience the difference between light and shade.

The Octahedron Mobile

Children start seeing color around two months of age and this mobile introduces primary colors, as well as three-dimensional objects. The traditional mobile has three octahedrons–one red, one yellow, and one blue–made of glossy, reflective paper. Light reflects off the shiny paper and attracts the infants’ attention. Although other simple geometric shapes can be used, it’s best if they have straight lines. When the shapes move, their movements simulate a circle. Although typically introduced around two months of age, the mobile can be used as early as one month of age, because some babies may already be seeing colors and those who aren't may be encouraged to see the new colors.

The Gobbi

We introduce this mobile around one or two months of age, but after the Munari and Octahedron. The Gobbi is made of five spheres hanging from a horizontal rod. The spheres are covered with embroidery floss and have graduation of one color from light to dark and hang in a progression on a 45-degree angle so that the darkest sphere is lowest and the lightest sphere is highest.

The Gobbi was designed by Gianna Gobbi (1920-2002), Dr. Maria Montessori's assistant in the early 1950s. Created specifically for a Montessori environment, the Gobbi helps babies begin to see a gradation of colors and sharpen their visual abilities.

The Dancers

This mobile is made with light, metallic paper of two different colors. The paper is cut into shapes and hung in a way that resembles four dancers. The parts move with the slightest current of air and light plays off the mobile as the dancers spin around.

This mobile moves faster, has parts with two colors, and has shapes that aren’t as definite due to each part within the dancer moving separately. These new visual components help babies with depth perception and focus as they track the different movements of the shapes.

Progression of Mobiles: Tactile

The next four mobiles–Stylized Wooden Figures, Three Colored Spheres, Bell on a Ribbon, and Ring on a Ribbon– represent a shift toward objects that babies can not only track visually, but also reach for, potentially grasp, and also even pull. For that reason, these mobiles need to be attached very securely!

Stylized Wooden Figures

The first of these visual and tactile mobiles is made of light wooden shapes that are ideally realistic figures that could actually fly and move, such as birds, butterflies, or airplanes. If they are painted, the paint should be non-toxic.

In addition to being at an angle for the child to see, this mobile and the subsequent mobiles also need to be hung at a distance where the child can stretch and be able to grasp the items.  

Three Colored Spheres

Made from interlocking circles that form an impression of a sphere when they spin, this mobile is a more tactile version of the Octahedron mobile. Each of the three spheres is a primary color (painted with non-toxic paint, of course), which makes the spheres very contrasting. Because they are made from interlocking wooden disks, the hanging objects also provide babies with four sides that are relatively easy to grasp.

Bell on a Ribbon

The Bell on a Ribbon is a wonderful mobile to use when babies begin to spend more time on their stomachs, or even when they start to be able to sit. Because of this change in the children’s positioning, the mobile height may need to be adjusted.

In the beginning, babies will hit the bell by accident, then they will gradually begin to try reaching for the bell to make the sound again. When babies make contact, the bell moves and they must work harder to grasp it. The bell can also be enclosed inside a crocheted covering.

The ribbon should be attractive enough to see, but not so colorful as to distract attention away from the bell. Although attached securely, the bell should still be large enough to not be a choking hazard.

Finally, for added interest, babies can also be positioned so the bell is at their feet so when they kick it will jingle!

Ring on a Ribbon

This is the last of the mobiles in the Montessori progression and helps babies use more precise movements in order to be able to grasp the moving ring. This simple wooden ring hanging from a ribbon or elastic offers so much benefit as babies reach, grasp, release, and try again. After babies are able to grasp a thick ring, the ring can be switched out for a slightly thinner version. Older babies may also use this material to pull themselves up.

Setting the Scene

In setting up an environment for newborns, one of the key areas is a place for movement. The movement area includes a mat and a hook on the ceiling for hanging the mobiles. It’s ideal for the movement area to have a mirror next to the mat, especially because babies are developing the ability to hold and control their heads. As such, they can look at the mobile in the mirror if they need to have their heads to the side.

Montessori mobiles are meant to be used in a movement area, rather than above a changing area or sleeping area. Interacting with the mobiles is important work for babies and they need prepared space for that work. The area should have natural light and enough airflow to move the mobile, while also being warm enough to be comfortable.

To make it easier to exchange the mobiles, an elastic band or ribbon is attached to the ceiling or off the wall (perhaps with a hanging plant bracket or something comparable). To make it easy to switch out the mobiles, the end of the ribbon or elastic band has a securely attached key ring. The ribbon attached to each mobile also has a ring, so the two rings can be slid together when it’s time to hang the mobile.

Because babies are really engaged when they are focusing on and reaching for mobiles, we want to be sure to allow them to concentrate. Before making a change or interrupting in any way, we take time to observe and wait for when focus shifts and babies show signs of being finished. We start by offering the mobile for short periods of time and then take a break if babies seem to be overstimulated. The best time to use the movement area and the mobiles is when babies are fed and well-rested.

Montessori mobiles offer so many benefits for our babies. During their time with mobiles, infants practice visual tracking, develop their fine and gross motor skills, strengthen their intentional and coordinated movements, and learn how to execute a planned action. Although seemingly simple, these materials for infants are incredibly profound!